Category: Uncategorized

  • 5-Gallon Bucket Lids Explained: Snap-On, Gasketed, Spouted and Gamma Seal

    5-Gallon Bucket Lids Explained: Snap-On, Gasketed, Spouted and Gamma Seal

    The bucket gets all the attention, but the lid decides whether the contents stay dry, stay sealed, and stay yours. On a custom order it is easy to pour your energy into the print and then accept whatever lid ships as standard, only to discover it is the wrong one for the job. In practice there are five lid families in common circulation for a standard pail, and they differ in ways that matter to the buyer: how well they seal, how easily they come off, how many times you can reuse them, and what they cost. Here is a plain comparison of all five, so you can specify the right lid the first time instead of reordering later.

    The five lids you will actually be offered

    Snap-on lids are the plain press-fit covers most buckets ship with. They cover and protect but do not seal in any serious sense, allowing on the order of half a cubic centimeter to one cubic centimeter of air exchange per day, and they usually need a lid wrench or a flat-head screwdriver to pry off. Expect roughly ten to fifteen open-and-reseat cycles before the fit loosens. Gasketed snap-on lids add a rubber ring that makes them genuinely airtight when new and properly seated, hold up for something like twenty to fifty cycles, and are available in UN-certified versions rated for shipping regulated liquids. Tear-tab lids are snap-on lids with a tamper-evident strip that tears away on first opening; after that they behave like an ordinary snap-on but the tamper evidence is gone. Spouted lids combine a gasketed snap-on with an integrated, reclosable pour spout for controlled dispensing, and tolerate fifty or more cycles. Gamma seal lids are the two-part upgrade: an adapter ring snaps onto the bucket permanently, and a threaded center panel screws in and out by hand with no tools. The gasket is replaceable, so a gamma seal is effectively reusable indefinitely, though the ring reduces the usable opening by about an inch and a half.

    What “airtight” actually means here

    Sealing runs on a spectrum, not a switch. A plain snap-on lid keeps rain and dust out but slowly breathes, which is fine for hardware, parts and dry goods you will use up quickly, and wrong for anything you need to preserve for months. Gasketed snap-on lids and gamma seals both reach a true airtight seal, but only when the lid is seated with firm, even pressure all the way around the rim; a lid pressed down on one side and forgotten is not sealed at all. If the bucket will hold food, remember that both the pail and the lid have to be food-grade, not just the pail. Food-safe plastics carry recycling codes 1, 2, 4 or 5, and buckets and lids are most commonly HDPE, which is code 2, or LLDPE, which is code 4. A food-grade bucket under a random shop lid is not a food-grade container.
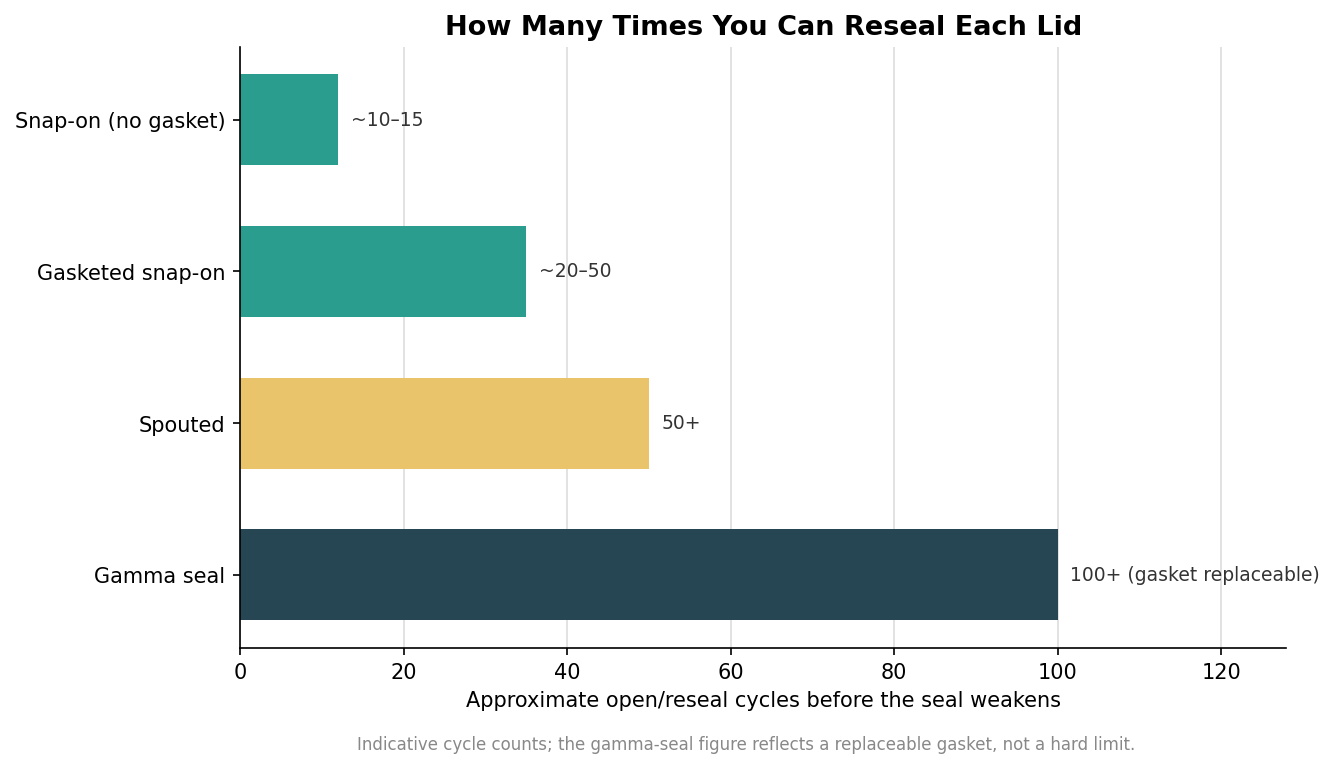
    Bar chart of approximate reseal cycles before the seal weakens for snap-on, gasketed, spouted and gamma seal lids
    Reseal life by lid type; the gamma seal leads because its gasket is replaceable.

    The reuse figures above are indicative, but the order is reliable: the simpler the lid, the sooner its seal tires. The gamma seal sits apart because its wear part, the gasket, can be swapped, so the lid itself outlives many cycles that would flatten a one-piece snap-on.

    Access versus security

    Decide how often the bucket gets opened before you pick a lid. If the answer is daily or weekly, the gamma seal earns its premium immediately, because opening a gasketed snap-on with a wrench several times a week is genuinely tedious and eventually chews up the rim. That is why gamma seals dominate frequent-access storage for pet food, flour, seed and emergency supplies. At the other end, a tear-tab lid exists precisely to be opened once: it proves to a retail buyer that the container has not been tampered with, and it is the right call for anything sold sealed. A plain snap-on splits the difference and suits contents that are stored for a long time but rarely disturbed, where needing a tool each time is a feature rather than a nuisance.

    Fit and compatibility

    Most, but not all, lids interchange across brands. Standard pails present an opening in the range of roughly 11.75 to 12.19 inches, and lids are built to that band, so a gasketed lid from one supplier will usually seat on another supplier’s bucket. Usually is not always, however, because the bead and lug profile at the rim varies, and a lid that snaps on but does not lock down is not sealed. Gamma seal adapter rings are made to fit the 3.5 to 7 gallon family, which covers the standard five-gallon pail comfortably, but again the ring has to match the rim it clamps. When you are ordering buckets and lids from different sources, confirm the pairing on a sample before committing to a full run, and remember that the gamma ring narrows the working opening by about an inch and a half, which matters if you scoop from the bucket with a wide container.

    Cost, and how decoration changes it

    Lid choice moves the unit price more than most buyers expect. Stock, undecorated lids run from about a dollar for a plain snap-on up to roughly ten dollars for a gamma seal, and that spread is per lid, multiplied across the whole order.
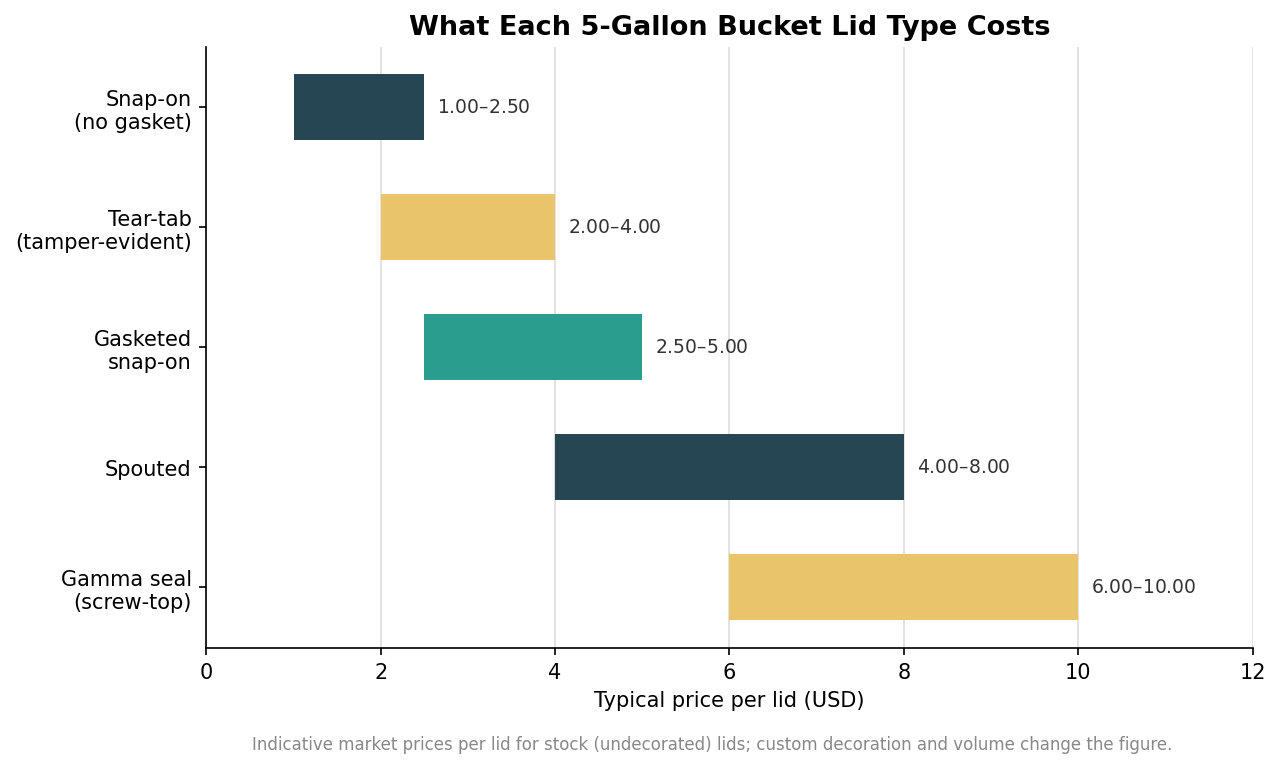
    Range bar chart of typical per-lid price in US dollars for five 5-gallon bucket lid types
    Indicative per-lid price by type, from plain snap-on up to gamma seal.

    On a branded run the lid is also a second decoration surface. A flat snap-on lid is the cheapest and easiest top to print, whether by in-mold label, screen print or pad print, and it gives you a bold branded cap for very little added cost. Gamma seals are two-part and are usually either decorated only on the outer ring or left plain, so they are a functional upgrade rather than a branding one. The practical takeaway is to reserve the expensive lids for products where the reseal convenience is itself the selling point, and to lean on a printed snap-on when the goal is simply to put your brand on the top. Match the lid to how the contents will be sealed, accessed and shipped, decide it alongside the bucket rather than after, and the finished product will both work and look the way you intended.
  • How Much Does a 5-Gallon Bucket Really Hold? Capacity, Weight and What Fits

    How Much Does a 5-Gallon Bucket Really Hold? Capacity, Weight and What Fits

    A “5-gallon bucket” is one of the most standardized containers there is, but the number on the label hides a few things worth knowing before you order in bulk or pack a product into one. The real brim volume is a little over five gallons, the usable volume is a little under, and what it weighs when full ranges from trivial to more than one person should lift. Here is what a 5-gallon pail actually holds, what it weighs, and how to match its capacity to the job.

    The “5 gallons” is a nominal figure

    Filled to the very brim, a standard 5-gallon bucket usually holds a bit more than five gallons, often in the range of 5.1 to 5.3 gallons. The extra space is deliberate headroom for handling, lid installation and a little expansion. A useful landmark is the metal handle: the rivets where the bail attaches to the sides sit almost exactly at the five-gallon fill line, so filling to that height gives you a true five gallons with headspace above it. For liquids you should stop short of that, leaving an inch or two below the rim so the contents do not slosh out or fight the lid, which puts practical liquid capacity closer to four and a half gallons. Dry goods can go higher because they do not slosh, though a sealed food-storage setup with a Mylar liner and an oxygen absorber takes back a little of that volume. Exact brim volume also varies a little between manufacturers and wall designs, so if the precise figure matters for a fill line or a label claim, confirm the rated volume on the spec sheet rather than assuming every “5-gallon” pail is identical.

    What it weighs when full

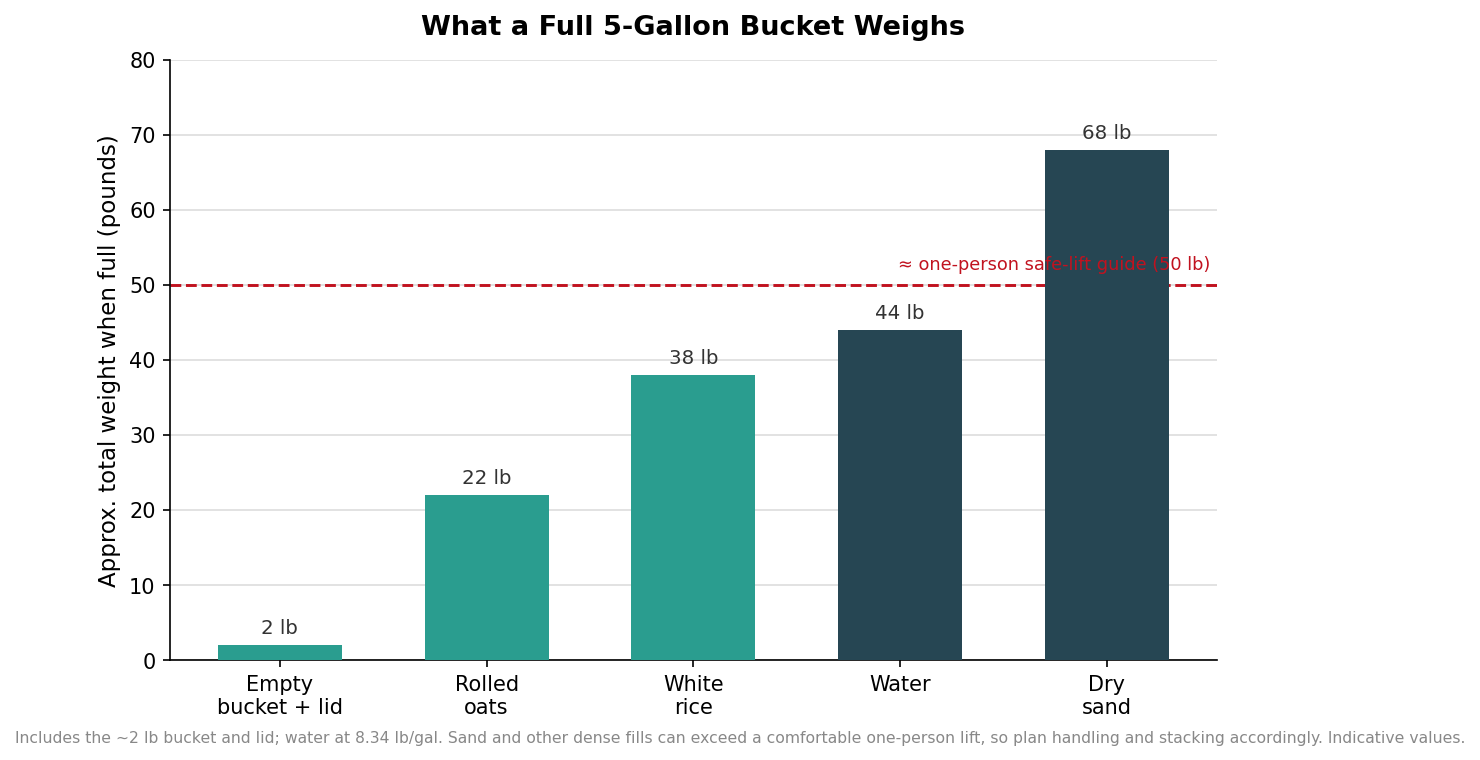
    An empty bucket with its lid is light, generally between one and a half and three pounds of HDPE. Add contents and the weight climbs fast. Five gallons of water weighs about 41.7 pounds on its own, so a water-filled bucket runs 43 to 45 pounds all in. Dense materials go well past that: a bucket of dry sand can top out near 70 pounds, heavy enough that it stops being a one-hand carry and starts being a two-hand, watch-your-back lift. This matters more than it sounds, because the wire bail handle and your own back, not the bucket wall, are usually the limiting factor. If a filled pail will be lifted by hand routinely, keeping it under roughly 50 pounds is kinder to whoever is doing the lifting. A plastic grip that slides onto the bail also makes a heavy pail far more comfortable to carry, and is worth specifying when the buckets will be moved by hand often.

    Vertical bar chart of the total weight of a 5-gallon bucket when empty and when full of oats, rice, water and sand, with a 50-pound safe-lift line
    What a full 5-gallon bucket weighs by contents, against a rough one-person safe-lift line.

    How much dry food actually fits

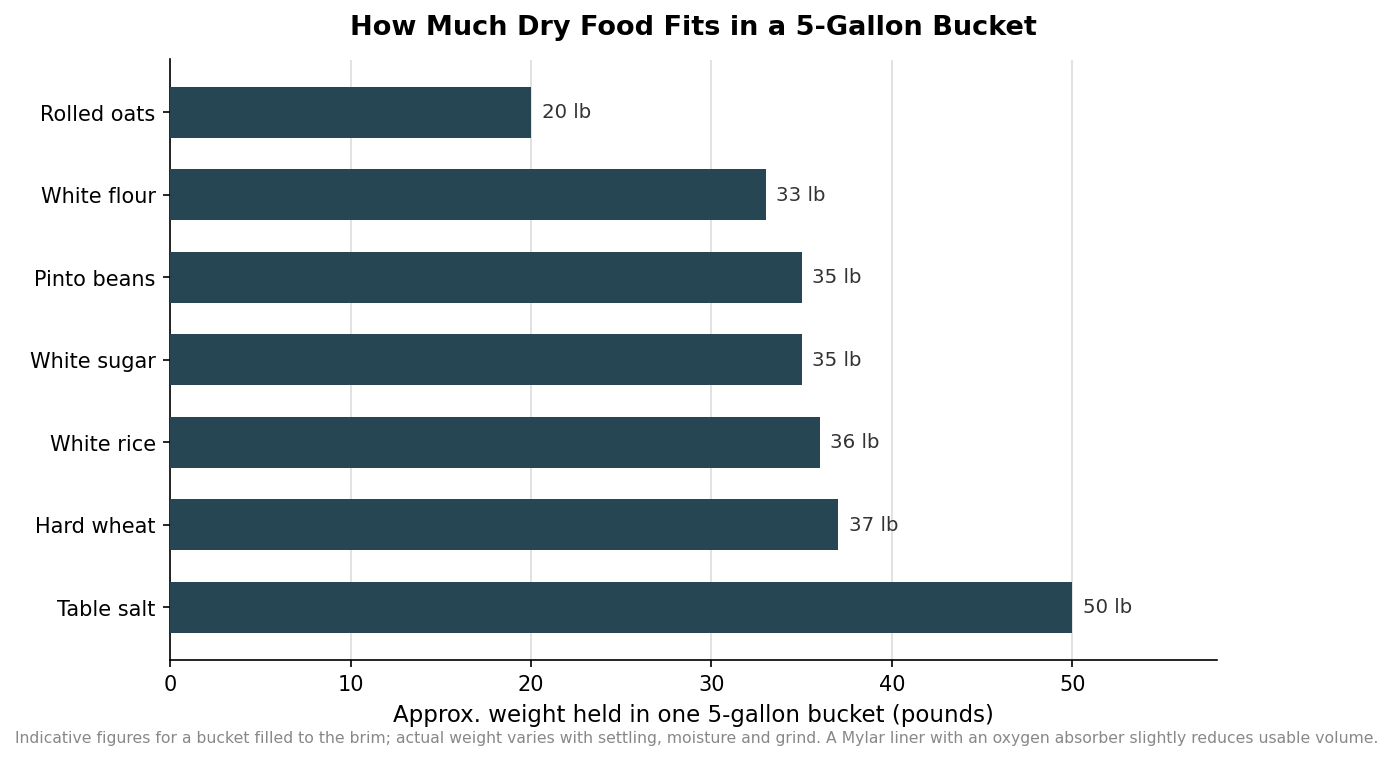
    For dry goods, capacity is easiest to think about in pounds rather than gallons, because density does the talking. A brim-full bucket holds roughly 36 pounds of white rice, about 37 pounds of hard wheat, and around 35 pounds each of sugar and pinto beans. Lighter, fluffier products hold less by weight: rolled oats come in near 20 pounds because they trap so much air. Salt sits at the heavy end, close to 50 pounds, because it packs densely with almost no void space. These are working figures rather than exact ones, since settling during transport, moisture and how finely something is ground all move the number a few pounds either way. Having a rough pounds-per-bucket figure in mind is still the fastest way to estimate how many buckets a given quantity of product will need before you order lids, liners and labels to match.

    Horizontal bar chart of approximate pounds of rolled oats, flour, beans, sugar, rice, wheat and salt that fit in a 5-gallon bucket
    Approximate weight of common dry goods held in one brim-full 5-gallon bucket.

    Matching capacity to the job

    The right size depends on how the bucket is filled and handled, not just on the volume. For liquids, coatings or anything that has to be poured, plan around that four-and-a-half-gallon working figure and the headspace it needs, and consider a spouted or gamma-seal lid if the contents will be accessed repeatedly. For packaging a dry product, think in pounds and confirm the filled weight lands where your shipping and handling can support it. For merchandise kits and promotional packs, the usable interior of a 5-gallon pail is generous, but bulky or oddly shaped items waste volume quickly, so a mock pack of one unit is the fastest way to see how many actually fit. As a rough guide for planning, the interior of a standard pail is around eleven inches across and a little over thirteen inches deep, which is roomy for soft or stackable goods but unforgiving for anything long or rigid. If your contents crowd the brim or blow past a comfortable lifting weight, that is the signal to step up to a 6- or 7-gallon pail or down to a 3.5-gallon size rather than forcing the fit.

    Practical limits worth respecting

    A quality HDPE pail is strong, but it has limits. Stacking filled buckets too high stresses the lower lids and can bow the walls over time, so keep stacks modest and let sturdy shelving carry the load where you can. For liquids, a gasketed lid is what actually makes the seal, and shipping certain liquids or regulated contents may require a UN-rated pail and lid rather than a standard one. And if the bucket will hold food, the container itself needs to be a food-grade resin, which is a material question separate from its size or strength. Get the volume, the filled weight and the lid right together, and a 5-gallon bucket becomes one of the most reliable, reusable packages you can put a product into.

  • 5-Gallon Bucket Specs Decoded: Dimensions, Wall Thickness, and Grade

    5-Gallon Bucket Specs Decoded: Dimensions, Wall Thickness, and Grade

    A five-gallon bucket looks like the most standardized object in the warehouse, and in one sense it is: they all hold about five gallons and they all stack. But once you order in quantity, or plan to ship product in them, the differences between two buckets that look identical on a shelf start to matter. Wall thickness, resin grade, and certification stamps separate a bucket that survives a loaded pallet from one that cracks on the second reuse. Here is how to read the spec sheet.

    The dimensions, and why “five gallons” is only half the story

    A standard 5-gallon pail runs about 14.5 inches tall with a top outer diameter near 12.2 inches and a narrower bottom around 10.3 inches, that taper is what lets empty buckets nest for shipping. Full volume is a genuine 5 gallons, which is 640 fluid ounces or about 18.9 liters, and filled with water that comes out to roughly 42 pounds. Add a snap-on lid and the height grows only a quarter inch or so, to about 14.75 inches.

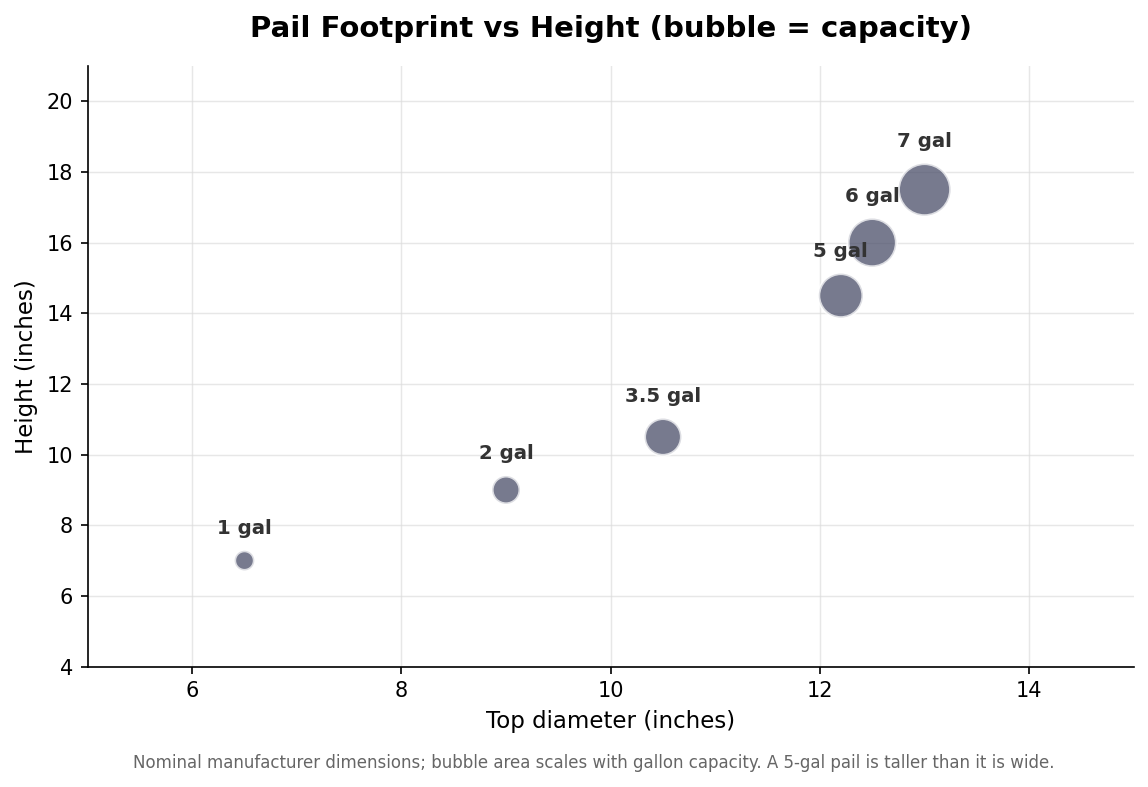
    The reason the label alone is not enough is that the family of pail sizes overlaps in ways that surprise people. A 3.5-gallon pail is about 10.5 inches in both height and diameter, a 6-gallon stands near 16 inches, and a 7-gallon reaches 17.5 inches at roughly 13 inches wide. Because the footprint grows more slowly than the height, the taller sizes can feel deceptively similar in width while holding noticeably more, which matters when you are fitting buckets to a shelf, a dispensing rig, or a shipping carton.

    Bubble scatter chart of plastic pail top diameter versus height with bubble size scaled to gallon capacity
    Pail height grows faster than footprint, so larger sizes stay relatively narrow.

    The lid decides whether the seal holds

    Buckets are usually quoted separately from their lids, and the lid choice changes how the container actually performs. A plain snap-on lid presses on and stays put but is not airtight and is a struggle to remove cleanly, which is fine for tools or dry storage. A gasketed snap lid adds a rubber ring that resists moisture and leaks, the right pick for shipping liquids or keeping contents dry. For anything opened repeatedly, a screw-style gamma seal lid, an adapter ring that snaps on once and then accepts a threaded center that spins off in a second, turns a one-time bucket into a resealable, near-airtight container. Standard lids and gamma seals are sized to fit the whole 3.5-to-7-gallon pail family, so one lid style can cover several bucket sizes in your lineup.

    Wall thickness is the spec that separates retail from industrial

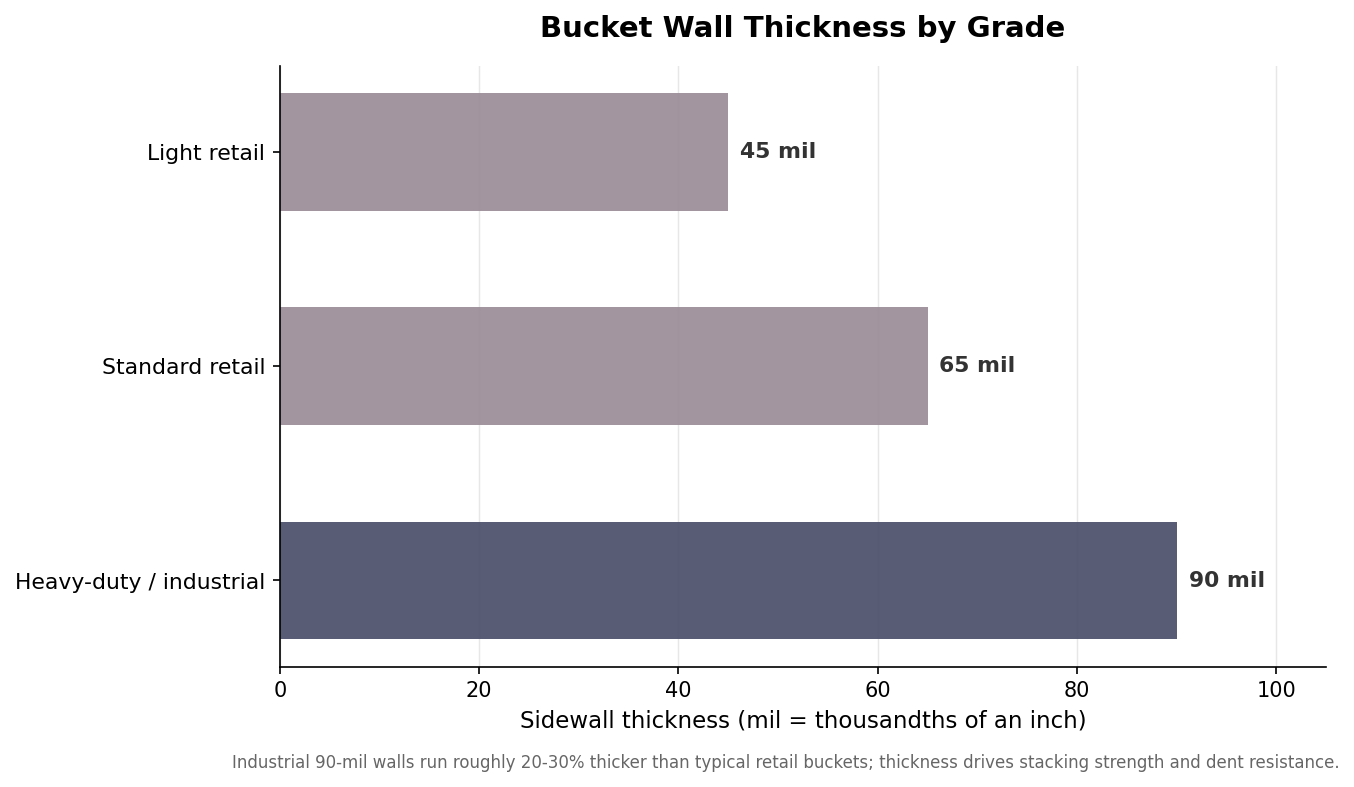
    If you read one number on a pail spec sheet, make it the wall thickness, quoted in mil, or thousandths of an inch. Ordinary retail buckets are commonly around 45 to 70 mil, while an industrial-grade pail is built at 90 mil, roughly 20 to 30 percent thicker. That extra material is not cosmetic. It is what lets a filled bucket sit near the bottom of a stacked pallet without the sidewalls bowing, and it is why a heavy-duty pail shrugs off the drops and forklift bumps that dent a thin one.

    The practical guidance is to match thickness to duty, not to price. For a light giveaway that holds nothing heavy and gets used once, a thinner wall is perfectly fine. For anything you will fill with product, stack, ship, or reuse repeatedly, the 90-mil grade earns its cost back in buckets that do not fail in the field. Ordering the wrong grade to save a few cents per unit is the most common and most expensive mistake buyers make with buckets.

    What HDPE #2 and the certification stamps actually mean

    Nearly all quality pails are molded from virgin HDPE, high-density polyethylene, carrying resin identification code 2, the small number inside the recycling triangle on the base. Virgin resin matters because recycled or reground plastic can vary in strength and is not appropriate for food contact. For food or beverage use, look specifically for compliance with the FDA food-contact regulation 21 CFR 177.1520; a bucket being HDPE is necessary but not by itself sufficient to be food-safe.

    The other stamp worth understanding is the UN rating, which appears as a code like 1H2/Y27/S. That string certifies the pail for shipping certain hazardous materials and encodes the container type, the packing group it is approved for, and the maximum gross weight it was tested to, often around 60 pounds for a 5-gallon pail. If you are shipping regulated liquids, the UN mark is not optional; if you are just packaging dry goods or using buckets for storage, it is a durability signal you can treat as a bonus rather than a requirement.

    Horizontal bar chart of bucket sidewall thickness in mil for light retail, standard retail, and industrial grades
    Wall thickness in mil is the clearest signal of a bucket’s stacking and reuse strength.

    Choosing the size and grade for the job

    Put the specs together and the selection becomes straightforward. Start with volume and weight: a 5-gallon of a dense product can exceed 40 pounds, which is near the comfortable lifting limit for one person, so for heavier contents a 3.5-gallon may serve workers better even though it holds less. Then set the wall grade by how the bucket will live, thin-wall for single-use and light contents, 90-mil for anything stacked, shipped, or reused. Finally, confirm the resin and certification match the contents: HDPE #2 with FDA compliance for anything edible, and a UN rating if the contents are regulated for transport.

    Every figure here is a nominal manufacturer specification, and real buckets vary a little between molds and suppliers, so treat the dimensions and weights as close guides rather than exact guarantees. But specifying capacity, wall thickness, resin, and any required certification up front gives a supplier everything needed to quote the right bucket the first time, and spares you the far larger cost of discovering the difference after a pallet has already shipped.

  • Screen Print, Heat Transfer, or In-Mold Label: How Custom Buckets Get Decorated

    Screen Print, Heat Transfer, or In-Mold Label: How Custom Buckets Get Decorated

    Two custom buckets can carry the same logo and cost very different amounts, wear very differently, and reproduce that logo with wildly different fidelity. The variable that drives all three is the decoration method. Before you compare quotes on branded five-gallon pails, it pays to understand the three ways a design actually gets onto the plastic, because each one is built for a different combination of run size, artwork, and working life.

    Screen printing: the volume workhorse

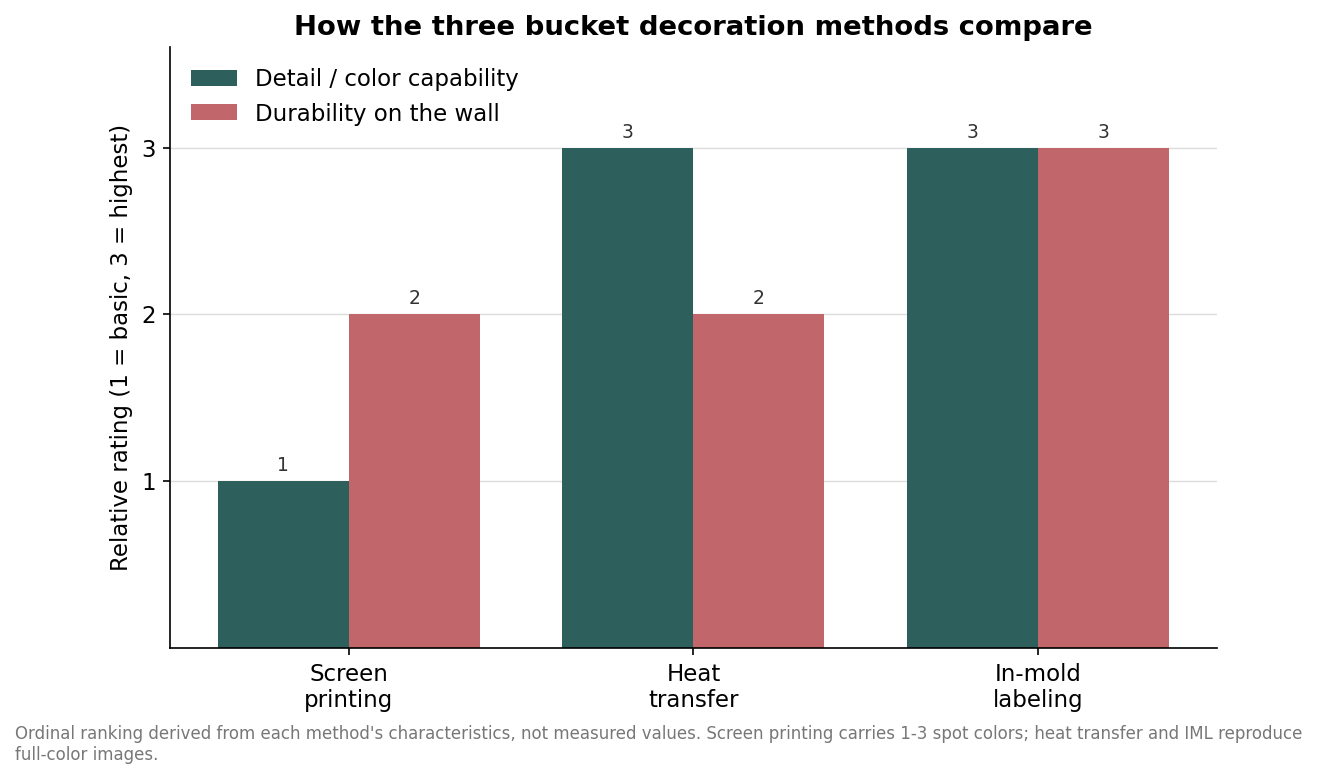
    Screen printing lays ink directly onto the bucket wall through a fine mesh stencil that blocks everything except the shapes you want. It is the most common method for a reason: the setup is simple, the per-unit cost is low, and it runs cleanly at high volume. The tradeoff is color. Screen printing handles roughly one to three spot colors, so it excels at bold logos, large type, and simple line marks but struggles with gradients, photographs, or fine detail, where the result looks comparatively coarse. Order minimums reflect the setup cost of burning screens; one common food-grade pail program, for example, starts around 480 units and offers one- or two-color printing on one or two sides, with a standard palette of white, black, yellow, orange, red, purple, blue, and green before custom-matched ink adds cost. If your brand lives in a couple of solid colors and you are buying in the hundreds or thousands, this is usually the sensible default.

    The cost structure is worth understanding because it explains the minimums. Each color needs its own screen, and each screen has to be made, aligned, and cleaned, so a two-color mark costs more to set up than a one-color mark and a four-color photograph is simply not what the process is for. That fixed setup is spread across the run, which is why per-unit pricing falls sharply as quantities climb and why shops set order floors in the hundreds rather than accepting a handful of pieces. Screen printing also wraps only so far around a curved wall in a single pass, so designs are placed on a panel or two rather than continuously around the bucket. For a bold, flat-color logo repeated across a large order, none of this is a real constraint, which is exactly why the method dominates promotional and bulk food-grade work.

    Grouped bar chart comparing detail capability and durability of screen printing, heat transfer, and in-mold labeling on buckets
    Screen printing wins on cost and simplicity; heat transfer and IML add full-color detail and durability.

    Heat transfer: photographic detail on a curved wall

    Heat transfer decoration works differently. A pre-printed film carrying your artwork is pressed onto the bucket with heat and pressure, releasing the image onto the plastic. Because the film is printed first, it can reproduce full-color, photographic images, barcodes, and fine detail that screen printing cannot touch. The bond is durable, with good water and chemical resistance, which matters for pails that live outdoors or hold aggressive contents. It sits in the middle on price, costing more than screen printing but less than in-mold labeling. Its main limitation is coverage: a transfer occupies a defined patch on the wall rather than wrapping the whole container, so you design around a panel rather than the full surface. Registration is tight enough for small text and detailed logos, and because the artwork is printed on film first, adding a second or third color does not multiply setup the way it does in screen printing. That makes heat transfer a practical bridge for buyers who need more than flat spot colors but are not ordering at the scale that justifies in-mold tooling. It is a common choice for retail-facing pails, kits, and anything where a photographic hero image or a gradient has to survive handling and moisture.

    In-mold labeling: branding fused into the plastic

    In-mold labeling, or IML, is the premium option and the most physically integrated. A printed film is placed inside the mold before the plastic is injected, and the two fuse together as the bucket forms. The decoration is not sitting on the surface; it is part of the wall. That yields the highest durability, resistance to fading and scuffing, and the ability to wrap the entire bucket and even the lid in high-definition, full-color graphics. The catch is cost and logistics. IML carries the highest per-unit decorating cost of the three and is tied to the injection-molding run itself, which makes it best suited to large, planned production quantities rather than a quick branded batch. When shelf presence and longevity justify the spend, nothing else looks as finished.

    There is a materials advantage that is easy to overlook. IML films are commonly made from polypropylene, a close cousin of the polymer used in many pails, which means the label and container can often be recycled together rather than separated. Because the decoration is molded in, there is no printed layer to peel, scratch, or fade off in sunlight, so an IML bucket tends to look new far longer than a surface-printed one. The reason it is not the automatic choice is purely economic: the film and the molding step add real cost per unit, and committing to a molding run only makes sense when your quantity is large and your artwork is settled, since changing the design means new film rather than a quick screen swap.

    Lollipop chart ranking per-unit decoration cost from screen printing lowest to in-mold labeling highest
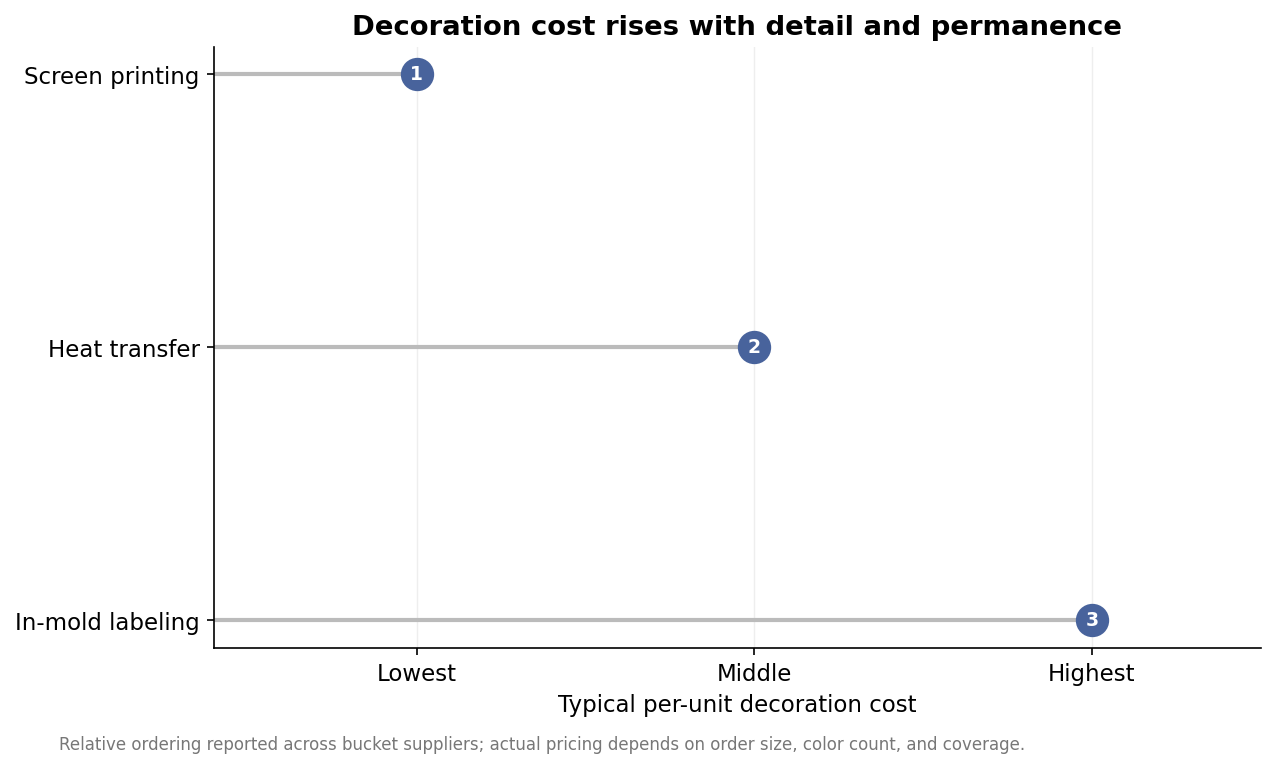
    Per-unit decoration cost climbs from screen printing to heat transfer to in-mold labeling.

    Matching the method to the job

    The decision usually resolves along four questions. How many colors is the artwork? One to three flat colors point to screen printing; anything photographic or gradient-heavy needs heat transfer or IML. How large is the run? A few hundred to a few thousand favors screen printing or heat transfer, while IML earns its keep at high volume. What will the bucket endure? Chemical exposure, outdoor UV, and heavy handling push you toward the more permanent transfer or in-mold options. What is the budget per unit? Screen printing is lowest, heat transfer is the middle ground, and IML sits at the top. Most branded-bucket buyers land on screen printing for straightforward logos and reserve the other two for either detailed imagery or products that need to look pristine after months of use.

    The container underneath the print

    Whichever method you choose, the pail itself is usually the same workhorse: high-density polyethylene, a five-gallon capacity of about 18 liters, and wall thickness in the 90-mil range on heavier food-grade models, with reinforcing ribs and a tapered body so empties nest for shipping. Regulatory graphics, such as the child-safety warning, are typically printed as part of the decoration on food-grade programs rather than added separately. Those specifications are indicative and vary by supplier, but they set the stage the decoration has to perform on. Get the method right for your colors, volume, and working environment, and the same bucket can read as a giveaway, a retail package, or a piece of durable branded equipment.

  • Why Branded Buckets Outlast Every Other Giveaway

    Call or Text us: (929) 605-4397
    Promotions

    Why Branded Buckets Outlast Every Other Giveaway

    The drawer test

    Promotional spend has a disposal problem. Most branded giveaways are in a drawer within a week and a bin within a year. A five gallon pail is one of the few that survives, for a boring reason: it has an obvious job the moment someone gets it home.

    Nobody has to be persuaded to keep a bucket. It goes to the garage, the barn, the truck or under the sink, and it keeps your name in a place the recipient looks at regularly for years.

    Fill it and it becomes the packaging

    The strongest version of this is a filled pail: samples, tools, treats or a welcome kit inside a branded bucket. The container is the gift and the packaging at once, which removes a cost line rather than adding one.

    Bulky is the point at a trade show

    On a show floor, a filled pail is carried by hand across the entire hall. That visibility is the whole reason booths order them in bright, high-contrast brand colors instead of neutral tones.

    Specify it like a product, not swag

    Decide lid or no lid based on how you are filling it — lidded presents better as a gift, open is faster to fill by hand at an event. Then treat the artwork seriously, because this item is going to be visible far longer than a lanyard. Minimum order is 12 buckets, production runs 2 weeks, and the mockup is free within 24 hours.

    Create your custom 5 gallon buckets now.

    Send your logo, quantity and date — you’ll get a free mockup and quote within one business day.

    Get a Quote
    GET A QUOTE
  • Custom 5 Gallon Buckets: A Buyer’s Guide

    Call or Text us: (929) 605-4397
    Buyer’s guide

    Custom 5 Gallon Buckets: A Buyer’s Guide

    Start with how the bucket will be used

    Most people ordering branded pails for the first time pick the decoration method last, when it should be the first decision. It determines your artwork, your durability and whether the bucket still reads your name in two years.

    A pail that lives on a retail shelf and a pail that gets dragged across a job site are not the same product. The shelf pail needs full-wrap photographic decoration; the job site pail needs ink that has been cured into the wall and does not care about abrasion. Work out which one you are buying before you look at anything else.

    Screen printing versus in-mold labeling

    Screen printing lays up to four spot colors directly onto the HDPE wall. It is the tougher of the two finishes and the right answer for anything reused, washed or abused. Its limit is artwork: gradients and photography do not reproduce in spot color.

    In-mold labeling puts the printed film into the mould and injects plastic around it, so the decoration ends up inside the pail wall. It handles photography and fine detail beautifully and can never peel, because there is no edge to lift. It is the shelf-ready option.

    Do not skip the wall gauge

    Standard pails are built to carry a load. Heavy duty pails are built to be stood on. The failure everyone eventually meets is the handle ears tearing out of a wall that was too thin for the way the bucket actually got used, and that is a spec decision, not a manufacturing defect.

    Order the lid at the same time

    Lids ordered separately are how colors end up not matching. Specify the pail and lid as one set so both are struck from the same run, and decide early between a gasketed lid for wet or shipping contents and a snap-on lid for shelf storage.

    What to expect when you order

    Send whatever artwork you have — even a photo of an old bucket. You will get a free mockup within 24 hours showing exactly where the print lands on the taper, unlimited revisions until it is right, and you pay nothing until you approve it. Minimum order is 12 buckets and production runs 2 weeks, with faster turnaround available on express shipping.

    Create your custom 5 gallon buckets now.

    Send your logo, quantity and date — you’ll get a free mockup and quote within one business day.

    Get a Quote
    GET A QUOTE
  • Food Grade vs Standard Buckets: What Actually Differs

    Call or Text us: (929) 605-4397
    Specs

    Food Grade vs Standard Buckets: What Actually Differs

    It is a resin decision, not a coating

    The phrase food grade gets used loosely enough that plenty of buyers assume it is a coating or a certification sticker. It is neither. The difference is in the resin, and it is decided before the bucket is ever moulded.

    A food grade pail is moulded from virgin HDPE with no regrind. Standard industrial pails commonly include reprocessed material, which is perfectly good for hauling gravel and entirely unsuitable for holding a brine. Nothing you can do after moulding converts one into the other.

    When you actually need it

    You need food grade any time the contents touch the wall and are later consumed: brines, doughs, stocks, bulk flour, grain, hops, adjuncts, pet treats. You do not need it for tools, hardware, soil, ice melt or anything pre-packaged that never contacts the pail itself.

    Seal the food grade ones

    If it is wet or aromatic, pair the pail with a gasketed lid rather than a snap-on. Breweries storing hops and kitchens holding brine both learn this the same way, usually once.

    You can still brand them

    Compliance does not cost you decoration. Food grade pails take the same screen printing and in-mold labeling as our industrial pails, so a commissary kitchen or brewery gets branded storage without a compromise. Minimum order is 12 buckets, production runs 2 weeks, and your free mockup arrives within 24 hours.

    Create your custom 5 gallon buckets now.

    Send your logo, quantity and date — you’ll get a free mockup and quote within one business day.

    Get a Quote
    GET A QUOTE
  • Hello world!

    Welcome to WordPress. This is your first post. Edit or delete it, then start writing!